Laser Settings
All Machines Are Different, We Need To Find The Right Laser Configuration For Each One And The Substrate To Mark
Best Way to Get The Right Settings For My Machine
The power settings that The New Ultra, LMM-6000 & LMM-14 and other Cermark products will work best at vary depending on the laser being used. For example, with a 35 watt CO2 laser, marking on stainless steel requires the use of 100% power at a write speed of 4-8 inches per second. Marking on aluminum requires 100% power at a write speed of 1-4 inches per second with the same laser. A more powerful laser will be able to make the same mark using less power or writing faster. Also, aluminum, copper, brass and other soft, heat conductive metals require higher powers and slower writing speeds. These metals will conduct heat away from the marking area faster than steel, thus requiring more heat (power) to make a mark. Your power settings will vary depending on the laser used and the substrate being marked, so some experimentation may be necessary to achieve the best mark.
Testing & Power Grids
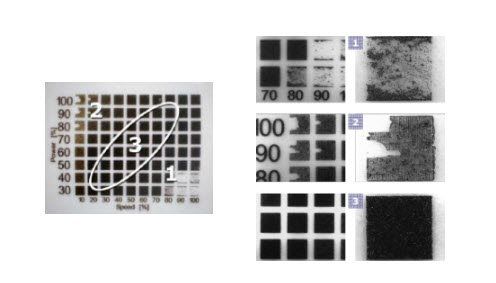
The process of establishing the correct laser settings to make CerMark laser marking materials successfully bond can be time consuming because of the number of variables involved. To expedite this process, it is possible to quickly determine the optimum settings using what is known as a “power grid”. In the laser bonding process, the two most important variables are the laser power and the speed with which the beam passes over the material. A power grid is a graphic file constructed to apply different speeds and powers to different parts of the image; this allows the user to test multiple settings with a single pass of the laser, greatly reducing the time taken to find the best setting.
In the picture below, each square in the grid has a different combination of power and speed settings as illustrated in the axes. The Y axis decreases power in increments of 10% from top to bottom (100% power at the top, 30% power at the bottom), while the X axis increases speed in increments of 10% from left to right (10% speed at the left, 100% speed at the right).
Power Grid
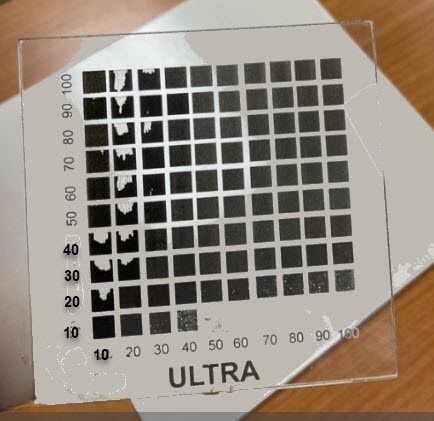
ULTRA on Glass
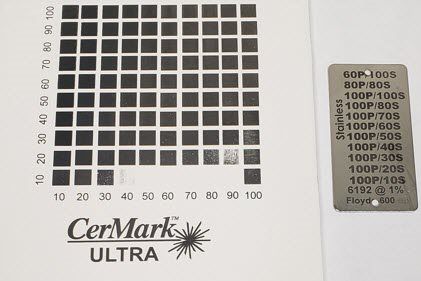
Ultra On Metal
As you can see, optimal marking will only take place when the right amount of energy is transferred by the laser. Section (1) shows that when power is too low and speed is too high there is not enough energy to create a bond.
Likewise, section (2) shows that too much power at a low speed causes the material to be removed, possibly causing damage to the substrate surface. More variables come into play when you consider the laser used to produce the mark. The laser’s wattage, the type of optics it employs, the quality of the beam, the spot size, and even the software can affect the mark quality achieved via the laser settings. For example, a higher wattage laser will deliver more energy than a lower wattage laser; a smaller spot size will mean more power in a given area. Keeping all of these variables in mind, it is hard to make specific recommendations for laser settings when marking with CerMark products. We can recommend a starting point for power and speed, but this may not be the best for your particular application. So, what is the magic equation that crunches these variables into a perfect power and speed setting? To determine a proper power and speed setting for any type of substrate you choose to mark the key is to create a power & speed test grid.
The ideal “process window” lies in section (3) of the photo. Any of these settings will produce excellent marks on the substrate. Picking a setting in the middle will allow maximum latitude for variability between machines and material. In other cases such as a production environment, the fastest speed possible to create a mark may be preferred.
In summary, when using a CerMark product for the first time on a new substrate, it is advisable to run a power grid on a scrap part in order to determine the optimal settings for your laser/substrate/material/coating combination.
All laser equipment will vary in power when new and as it gets, two identical machines coming out of the manufacturer may vary in power by +/- 5% power. As the machine is used in production, power can change because of dirty optics, beam alignment (GCC Lasers) , or possibly differences in materials. Make sure you test your material before running production, if anything it's always recommended to start low and increase your power as needed.
Shelf Life and Storage for Cermark Products (Click Here)
Starting Points Recommendation:
*Additional laser settings for Lmm6000 and Lmm14 ( click here )
BLACK ON GLASS
Glass And Ceramic
LMC6001 LM6013 LMC6062 LMC98 LMC6044LMC 12 For Plastics Is Currently Not Available / New Ultra Does Not Work With Plastics.
We Have Had Some Customers Use The LMC-6044P Aerosol On Some Plastics With Success. (Variables To Consider)
Laser Settings Notes:
Every substrate will react to the amount of energy applied differently. For example, if two laser machines are exactly the same, even with the same advertised power tube and from the same manufacturer, it happens that as the age of the CO2 laser, the energy efficiency of the laser tube degrades. This means that as the machine is used, its power capability changes. This will affect the power settings and the optimum speed the machine should work for a given substrate.
Factors to Consider When Marking Metals:
There are numerous variables that must be considered when establishing the proper settings: substrate, the thickness of the substrate, and the substrate’s ability to conduct heat will all have an influence in the process. For example, aluminum conducts heat much better than steel, so it will require more marking power (heat) to do so. A thicker substrate will dissipate heat much faster than a thinner one, again meaning more marking power is needed to achieve a good mark.
More variables come into play when you consider the laser used to produce the mark. The laser’s wattage, the type of optics it employs, the quality of the beam, the spot size, and even the software can affect the mark quality achieved via the laser settings. For example, a higher wattage laser will deliver more energy than a lower wattage laser; a smaller spot size will mean more power in a given area. Keeping all of these variables in mind, it is hard to make specific recommendations for laser settings when marking with CerMark products. We can recommend a starting point for power and speed, but this may not be the best for your particular application. So, what is the magic equation that crunches these variables into a perfect power and speed setting? To determine a proper power and speed setting for any type of substrate you choose to mark the key is to create a power & speed test grid.
Vectoring Versus Rastering
In all laser marking systems the laser beam is delivered to the substrate through a focusing lens. It is important that the laser beam is correctly focused to make the process work. Some laser systems come with a set of different interchangeable lenses for focusing. Choosing the correct lens for focusing is equally important to achieve high contrast marks. The spot size of the laser beam at the markable substrate directly depends on the focal length of the lens. This in turn directly affects the optimum intensity and speed of marking. In general, shorter focal length lenses generate tighter focuses and require lower intensities and vice versa. Please follow your laser manufacturer’s recommendations and procedures on beam focusing.
Power Settings
The type of laser being used is the primary consideration and the settings between a solid state laser and a CO2 will be entirely different. We recommend a minimum of 30W of power for CO2 lasers, and 10W of power for solid state lasers. Feel free to consult our "Choosing a Laser section for more information". If all you want to do is practical and small jobs then you need a small low powered machine let say 30 watt with a small 300mm by 600 mm working area. These machines are cheap, desktop, generally light weight in construction and process materials relatively fast and are usually considered disposable after many years. Type of hobbyist machine will place you in competition with every body hobbyist within 200 km. (GCC Lasers)
Resolution Settings
Lasers can operate in different modes; the first mode is vectoring, in which the beam is continuously steered around the image in much the same way as a plotter moves. Lasers can also operate in a mode called rastering in which the image is achieved by pulsing dots in much the same way a dot matrix printer works. Both modes will work with CerMark laser marking materials, however, the lasers settings may differ. Consult Type of Lasers for more insight into this.
Speed Settings
The next most important setting is laser speed, this being the speed at which the beam moves across the material while marking. All of the speed settings on these pages are expressed in inches/second (in/sec). Note that many lasers will express speed as a % of the maximum system speed so that 70 in/sec is listed in the software as being 50% speed on a system that has a maximum speed of 140 in/sec. Some laser software programs express the speed settings in metric units (cm/sec). It is important to note the difference between English and metric units and do the proper conversion when translating the settings to different lasers.
There will also be settings that determine the resolution of the image in terms of how many dots/inch (DPI) or pulses/inch (PPI) are used. These settings may also influence the marking speed with a higher resolution mark taking significantly longer to complete.
We have had a recommendation from our costumers: "in some cases it works to lower the speed and increase the recommended power as this allows more thermal exposure at a lower speed"...
If your solid state laser has both CW and pulsed operating modes, we generally recommend using CW mode. Contrary to conventional laser marking logic, when bonding laser marking materials rather than direct laser marking, it is better to apply more steady, lower peak power laser energy than sudden, high peak power bursts. If your laser does not have CW mode, however, you can mimic this mode by setting your Q-Switch frequency to greater than 50 kHz. An exception to this rule is LMM6018.LF tape which will respond well to pulse mode. Additionally, if marking speed is a major concern when laser bonding on metal, you may be able to reduce cycle time by running in pulse mode, as well. This strategy, however, is not recommended for glass, ceramic.